Pink Cherry

Friday, December 20, 2013

A bonne Spa Milk Salt Review

I never been so conscious with my skin before until I touched my classmates hands and it feels so smooth, just like baby's skin. I feel so insecure back then because I admit that my skin is really rough and dry. So when I came back home from school, I immediately asked Google on how to have smooth skin and everyone's answer is a regular exfoliation. I also found out that exfoliation has a huge contribution in achieving young-looking skin so this must be a part of our regular beauty regimen. Right after then, I am in a search for body scrub and I came up with this A bonne Spa Milk Salt.

I've been using this product for months now and I guess this is the right time to make a review and put an end to those arguments whether this product is effective or not. But before I put this review into start, I want to make things clear that all informations stated below is based on my own experiences. So this might vary into each individual because we all have are own preferences and likings.

A BONNÉ Spa Milk Salt 
Made in Thailand


The product claims that it is a skin whitening and slimming product with Milk Formula and natural spa salt benefits. It provides nourishment to your skin with Pure Milk, Dermawhite and Allantoin. It removes dirt deposit and dead skin cells from your body, giving you a new and radiant skin.

Is it really effective just like what it claims? Let's see =)


♥ PRICE ♥
This one is really affordable. It only costs 65php for a net content of 350g (around 1.46$) 

♥ PACKAGING ♥
Let us admit that sometimes, we rely on the packaging of the product before we purchase it. That just happens to me when I saw this salt scrub. The packaging is so cute and looks very interesting! It came up with different bottles but it is also available in sachet. I recommend you to buy the sachet one because it is cheaper.

♥ SMELL ♥
The smell is one of the reason why I fell in love with this product. It smells like milk, the one that I am drinking back when I was a kid. However, the smell doesn't stay long on your skin.

♥ TEXTURE & FEEL ON THE SKIN ♥
This scrub is kind of sharp. It irritated my skin at first application, so instead of rubbing it, I just let the grains to melt on my skin. But as time passed by, you will get over with it. Just avoid putting some of this product on cuts or wounds or it will stings and the pain is intolerable. 

♥ NUMBER OF USES ♥
I am exfoliating my skin thrice a week and the whole sachet lasted for a month.

♥ AVAILABILITY ♥
Even this product is from Thailand, it is scattered here all over the Philippines. It is available in any Watson store, Department Store and even in local supermarkets.

♥ CONCLUSION ♥
I like this body scrub really much, it is really great in exfoliating your skin. You can feel your skin's softness and smoothness after shower. However I didn't notice any whitening and slimming effect. The introduction of the product behind is so exaggerated. I don't even know where they got that slimming idea. However, I still don't think that it is a bad thing since no other scrubs can perform whitening effects on your skin either.. oh well! Plus it is cheap people!! 

PROS:

Very affordable
Available even in local stores
It has a milky scent
You can feel the instant smoothness and softness of your skin after shower

CONS:

 Stings in wounds or cuts
 The scrub is kind of sharp and hurts skin in first application
 Doesn't whitens skin
 No slimming effect

♥ RECOMMENDATION ♥
I recommend this product to people who are after for a good exfoliation. But if you're looking for a product that will whitens your skin, this product is not for you.


I rate this product 4/5 ♥♥♥♥


Saturday, December 14, 2013

Ulzzang Make Up Tutorial Series: Natural Ulzzang Eye Make Up

Hello everyone!~ As I've said earlier on my last post, I am now working with my next make up tutorial which is the Natural Ulzzang Eye Make Up. This eye make up is suitable for all girls that is on a rush since this only took me less than 5 minutes to make. And also, if you don't want to have exaggerated eye make up like some ulzzang do, this is for you!~


1. Put a matte dark brown eyeshadow on your crease. This will add dimension to your eye and make an illusion of deeper crease. As you can see, I kind of overdid this part on the first picture, but don't worry, just blend it with your finger or with a blending brush. See? You should end up like the second picture.

2. To give your lids an emphasis put white eyeshadow on it.. It will brighten up your eyes and will help in awakening sleepy eyes. Remember to use matte eyeshadows. As possible, let's avoid using those shimmery ones because we are aiming for a natural look, more like no make makeup look.


3. Draw a thin line very close to your upper lash line to make an illusion of thicker lashes and lively eyes. Extend the line upward. Not so upward, we don't want to end up with a cat eye. This extended line will make your eyes longer and bigger.

TIP: 

To avoid ending up with cat eyes, extend the line with a curve instead of extending it with a very straight line.
It is better to use a pencil eyeliner because it creates more subtle lines than any other eyeliners.

4. Starting from your lower lash line, draw thin line and connect it on the line that you drew just awhile ago. This will create a V line! Laaahh! This is so hard to explain. Just look at the picture ^^ The image tells it all!~

5. Create some aegyo sal! Just squint your eyes and put a white eye shadow on the puff area.


6. Finally, to finish off this sweet eye make up, curl your lashes and put mascara for dramatic lashes!! <3
 

BEFORE AND AFTER

As you can see, nothing really changed that much. We only want it to look natural. Do you notice how lively and awake your eye is on the second picture compared to the first? =) I am wearing this look except the eyeliner whenever I am going out because I am really a fan of natural look. 

Friday, December 13, 2013

Rants + Mini Haul

I never feel so overwhelm like this before! I feel so happy to the trust that my mom have given me this past few days. Few years back, while my friends are going out and hanging out together, I am inside my room, reading books, surfing the net and watching television.This doesn't mean that I prefer being alone rather than going out with my friends. It is because I have no other choice. My mom is not allowing me to go out all alone with my friends. She's is so protective and strict and her timeless excuse is because I'm still young to go out all by myself. That is why I feel so grateful in this week because she allowed me to go out shopping with my friends yesterday, to do some aerobics with my classmates today and to go on a resort with the whole class next Friday! Yes, most thinks that it's just a small thing to feel glad about, but I really do appreciate those small things! I promise to my own self to try my best not to break that trust. It really means a lot to me.

So in this post, I will just do some rants which can be rarely seen in my blog. As you can see, this bubbly blog of mine are loads of tutorials, reviews, and outfit posts which makes me feel like I am a robot. Why? Because it makes me speak a bit more formal than I usually do, more like scripted. Unlike in this unplanned post, I'll just write whatever comes in my mind. I also think that this is a great way for my readers to know more about me =)

Yesterday, our school had a field trip to Star City. I have no hard feelings for not being part of it. Actually, that day was such a great moment for me and my friends. There are only few students in school because of the said event so the whole class is irregular. So we decided to go window shopping at Robinson. Do not get us wrong, we are not ditching our class and we have no plan to do such thing! We asked our parent's permission first! =) As I said earlier, we only planned to do some window shopping but we ended up buying some things. It is really hard to go to the mall and return home empty handed. XDDD

These are the items that I bought yesterday.
1. Sheer Attraction Intimate Secret- I got this from Japan Home Centre. I really love the sweet fragrance of it, really suits my personality and yaaay! It is in my favorite color <3

2. Mustard Oxford Shoes- I am really obsess in flat shoes nowadays. I mean, who wouldn't? They are so comfortable to wear. Simple yet fashionable.

3. Loreal Cleansing Wipes- I also got this from Japan Home Centre. I am suffering to lots of pimples in my forehead....again! T^T I am so lazy to wash my face before going to bed and even if I did, it feels like wash isn't enough! So I bought this cleansing wipes, it is a make up remover. So whenever I feel lazy to wash my face, I can just grab this and wipe it on my face. I am planning to make a review about this product soon!~

4. Compact Powder- I bought this in a random local store. I will bring this along to school. Good thing about this, it looks like you're not wearing any foundation. It doesn't ended up being cakey.

Let's move on to the next page =) Earlier, me together with my friends again went to the gym and do some aerobics. I have no idea that it will be so much fun! I am not a sporty person so I got tired easily, but I swear, it feels so refreshing!~ It even pushed me to made a resolution to do some exercise daily so I can be fit and of course, to lose some fats lol.

So I don't know how to end up this post. hahaha. uhmmm. bye? Until my next post!~ Please wait for the next series of Ulzzang Series which will be Sweet Ulzzang Eye Make Up =) Thanks <3

Thursday, December 5, 2013

Ulzzang Make Up Tutorial Series: Gradient Lips


You probably seen this trend around since it is really popular in Asia especially in Korea nowadays. I've been using this style for quite a while now and I love how this style creates a young and innocent look.Oh come on!  Who don't want to be young?  So please continue reading if you want to know how I am creating this gradient lips on myself.

I've been doing this gradient lips for months now and I already tried lots of techniques to achieve this. So the one that I' will be showing you is the easiest technique I have come so far. If you want to have a better result make sure that your lips are smooth and not dry so exfoliate is a must which I forgot to do. Naah, sorry for not following my own advise. >__<


STEP 1: Apply a nude color on your lips. You can use concealer, foundation, nude lipstick anything that will gives nude color. In my case, I used my BB Cream.
                                   

STEP 2: Put some color on the inner side of your lower lips. Red or pink works best but you can choose any color of your choice. Blend everything with your fingertips or cotton buds while the tint is not yet dry.
                                               

STEP 3: Apply some gloss. It will make your gradient lips more natural and smooth.


It depends on you on how much color you will put on your lips. If you want a more noticeable gradient lips you can apply the color twice or thrice, but if you're looking for natural look, small amount is enough. 


WE'RE FINISH!!


Monday, December 2, 2013

Ulzzang Make Up Tutorial Series: Natural Looking Aegyo Sal

What is AEGYO SAL?

First thing and foremost, eye bags and aegyo sal are way too different. Eye bags are usually darker than your natural skin tone and their sagging look makes you look tired and older than your actual age. However, aegyo sal or tear bags are the opposite of it as they are commonly found in children so they actually supposed to make you look younger.

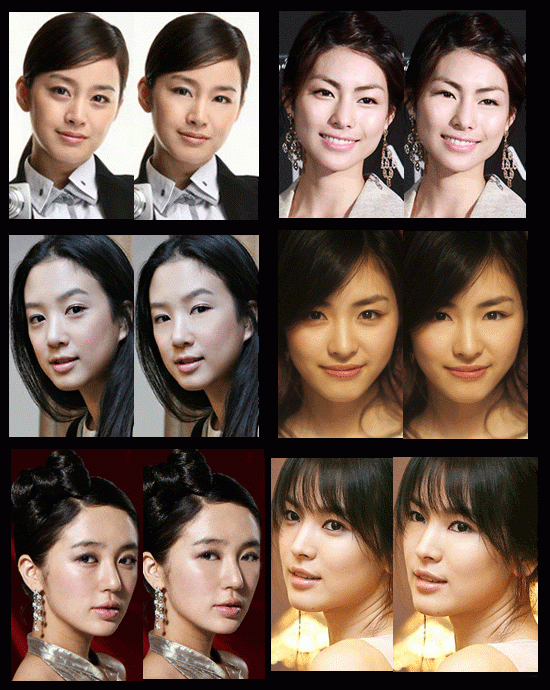
Yeah, it is just a small part of your face but you know what? There is a huge difference on having an aegyo sal. It makes you look more innocent and youthful. It also makes your eyes appear brighter and bigger! So this photo that I found somewhere in the internet will show you how these six Korean actresses look if they have no aegyo sal at all. Look how big the difference is!!

How to know if you have aegyo sal?

It is very easy to identify if you have aegyo sal. Just grab a mirror and SMILE. If there’s a little pouch or this layer of skin gathered below your eyelids, LUCKY YOU COZ' YOU HAVE AN AEGYO SAL. However, if you don't have it, you can still achieve it through the use of make up which I will show you how, so please keep scrolling!

Maybe, the technique of putting darker eye shadow under you aegyo sal is the most known steps on how to create aegyo sal but I do not recommend it to you guys if unnatural look is not in your liking. Okay, it  looks good when you're smiling but it looks VERY WEIRD when you're not. It also makes your eyes become dull. Again, I don't recommend it!

Unlike other tutorials that are using lots of shimmery thingy and dark eye shadows, we will only use FOUNDATION or POWDER. This technique is the EASIEST WAY to create a VERY NATURAL LOOKING aegyo sal. Just make sure that the foundation that you will use is lighter than your skin tone. 

One factor why an aegyo sal is commonly mistaken as eye bags because of your eye bags underneath it! So the first thing we have to do to enhance our aegyo sal is conceal your eye bags

So lots of people use  their fingertips in drawing the aegyo sal but since we are all beginners here, it is better if we will use a q-tip so we can control the amount of foundation we will put on our aegyo sal. Plus, it will not be messy! I think I should stop blabbering now, so here are the steps

1. Squint your eyes so your natural aegyo sal will appear. Highlight it all by putting foundation (I repeat, lighter than your skin tone). Do not be afraid to exaggerate it. We can fix it later.

2. If you think it is a bit weird because the foundation is too thick that it tends to give you a creepy look, with the use of your fingertips blend it with your skin.


AND THERE YOU GO!! YOU ALREADY HAVE AEGYO SAL!!


Sunday, December 1, 2013

Ulzzang Make Up Tutorial Series: Korean Straight Brows (No shaving and grooming)

I am sure that you are already familiar with Korean Straight Brows (in the first place, why would you end up in this tutorial if you don't have any idea about it. ^^) wherein the brows are intentionally thick and straight. I've been wanting this brows for so long because it tends to make you look young and innocent. This trend starts from Korea, so you will notice that a lot of actresses in that country have this kind of brows.

There are lots of tutorials all over the net that will help us to achieve this look. However I didn't tried any of them because it all requires an extreme shaving of eyebrows, which my mom will not allows me to do. I am quite afraid also, because there are some cases that after shaving your brows, the hair may not grow again like the way it is supposed to be. So I made my own version of creating this straight brows which do not requires shaving and grooming. This is for those people who are also afraid to shave off their eyebrows but want to achieve this straight brows.


Let's Begin!

 
Try your best to make the lines soft as possible. Well then, I'm sorry for making the strokes a bit dark. I did it on purpose so it be easier for everyone to visualize what exactly I'm doing. ^^~

PS: Sorry for my sleepy eyes!~

Saturday, November 30, 2013

Ulzzang Make Up Tutorial Series: How to achieve clear glowing skin and slimmer face.


What can you notice about her face? Yes, she do possess a clear and flawless skin plus her small face specifically know as V line. We can achieve this by the power of make up and that's what I will show you in this post. Before I put this tutorial into start, I just want you to know that there are some steps without pictures because I think it is not that mandatory since it is very easy and very basic.

So what are we waiting for? LET'S START ♥


1. CLEANSE YOUR FACE.AND HANDS
It is very important to clean your face and hands first before anything else to make sure that you will not pollute and clog your pores. It will also helps you to remove excess oil on your face so your face will not become oily easily.

2. MOISTURIZE YOUR FACE
This will makes the application of the BB cream easier and glides on your face smoothly. As possible, use a a moisturizer with a radiant and dewy finish to achieve the youthful look.

3. APPLY A BB CREAM

Using your ring finger, dab some dots on the main areas of your face: forehead, nose, cheeks and chin.
Don't rub your BB cream into your skin, instead, tap it with your ring finger in a circular motion for an even application. So maybe you are asking yourself why I told you to use your finger instead of a blending brush. The only reason is that, it gives a more natural look and prevent the makeup to look cakey.


4. CONCEAL SOME IMPERFECTIONS
Having dark circles is a big NO to ulzzangs, so conceal the under of your eyes. Just like what we did to the applying of the BB Cream, dab some dots instead of like painting it. Too much eye make up will make you look older so be gentle in applying concealer.
You can also conceal, the side of your nose and mouth, and of course some pimples.

For that glowing and radiant effect, we need some highlighter. These are the areas that we will highlight.

Temples- to make your face looks slimmer and brings the focus on your eye.
Bridge of your nose- to make make an illusion of slimmer and taller nose.
Cupids Bow- to make your lips pout a little.
Chin- to bring it forward and to look more pointed.

To achieve that slimmer face, we need some contouring. Use a brush and a matte brown shadow. Do not over do it to create a natural look. So this pattern is for you, that is the area that you need to contour. Putting a shadow on both sides of your face will make an illusion of slimmer face


♥  YEEEYYY! WE'RE FINISH =)))  ♥

So yeah, that's all! Thanks for reading this! ^^!~


Ulzzang Make Up Tutorial Series

Hello everyone! I'm back! I've been planning about this for a week now since I realized that I been making random make up tutorials on my blog. And since I am currently addicted to ulzzang style for a months now, I came up with this Ulzzang Make Up Tutorial Series.

In this series, I will post lots of tutorials or step by step to achieve the ulzzang look. For me, everyone have what it takes to be an ulzzang! All we need to do is to pass those ulzzang standards which are big eyes (the main focus) , clear and pale skin, small face, straight brows, and small lips! :3

So these are the upcoming posts for this series.

♥ How to achieve clear skin and slimmer face (Highlighting and Contouring)
♥ Korean Straight Brows (without shaving and grooming)
♥ How to have natural looking Aegyo Sal
♥ Gradient Lips
♥ Everyday Ulzzang Eye Make Up Tutorial

I may also add more series, so you can just comment on the comment box if you have some request and I'll try my best to make it =)

I've been mentioning the word 'ulzzang' in this post for the nth time, so for everyone who doesn't have any idea on what ulzzang means, I will give you a brief introduction! ♥

Ulzzang means 'best face' in Korean. It is a term given to those people who are known for their good looks. There are lots of ulzzangs that was able to enter the Korean Entertainment business, examples are Chanyeol and Sehun of EXO (ohhh! annyeong exostans! ^^). Others also became a model for popular Korean fashion websites. However, though this style is from Korea, there are also followers of this trend from Asia, or must I say, all around the world! 


Here are some of my favorite ulzzang =))


Kim Shin Yeong, she is the first ulzzang I knew. I once seached 'pretty girl' on google and I saw her picture. That was the day I got interested about ulzzang =)) She is so pretty ♥♥


Next one, is Hong Young Gi. She is so cute and mini sized. HAHAHA. I watched Ulzzang Shidae and found out that she is so small =)) But she is so funnnnnyyyyyy =D


Are you ready to embrace and try this trend? 
So stay tune as I'll post the first series which will show you how to achieve 
clear skin and slimmer face.

Ahmmm, I don't know. My mandatory camho shot? lol


Friday, November 1, 2013

Airi's Giveaway: October Pick Me Up

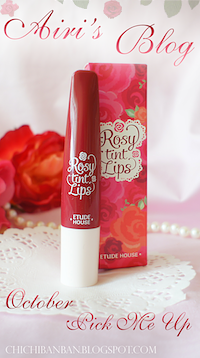
Hello everyone! So I joined this giveaway by beautiful and gorgeous Airi :) I thought to make a post about it so you can also join. Luhhh, let's join together ^^ So, the giveaway will be Etude House Rosy Tint Lips No. 8


I really want to win this one! Though I'm not lucky when it comes to giveaways, I still tried. Only because I really want to own an Etude House product lol. It's just, it is really expensive for me T^T Visit this link for more info (http://chichibanban.blogspot.com/2013/10/october-monthly-pick-me-up-etude-house.html)


And here are the codes for the banners: 

Blog post (700x570)
<center><a href="http://chichibanban.blogspot.com/2013/10/october-monthly-pick-me-up-etude-house.html" title="Click here to join!" target="blank"><img src="http://i1137.photobucket.com/albums/n514/chichibanban/banner1.png"></a></center>


Sidebar (200x358)
<center><a href="http://chichibanban.blogspot.com/2013/10/october-monthly-pick-me-up-etude-house.html" title="Click here to join!" target="blank"><img src="http://i1137.photobucket.com/albums/n514/chichibanban/sidebarbanner.png"></a></center>

Good luck to all of us!

All about Blog Endorsement and Advertorial

Some people asked me if I am open for some blog endorsement and advertorial, rather than to answer their questions individually,  I decided to post it here so more people would be able to see this ^^ As the matter of fact, I am really interested in endorsements and advertorial. And this is the exciting part, IT IS FOR FREE!! For everyone who are interested, keep scrolling!


FOR BLOG ENDORSEMENT:

I am planning to do a shout out once a week wherein I will feature other blogs. Though I do not own a big blog, I am really willing to help other bloggers! If you want your blog to be featured, all you need to do is contact me and tell me something about your blog!


FOR ADVERTORIAL:

Well, if you want me to do some reviews about a certain products, send me a mail at (dianamaye.music@gmail.com) You can send me the stuff and I'm 100% sure to make a very honest review. However, if you want your online store logo to be in my blog's sidebar, just send me the logo and the link of your online store.


THANK YOU! 
 I HOPE I CAN HELP YOUR STORE AND BLOG TO BE BIGGER AND GROW FASTER!
SO LET'S WORK TOGETHER WITH ALL BLOGGERS HERE
:)

Sunday, October 27, 2013

DIY: Lip Stain


I really want to own a lip stain since it is long lasting and will make gradient lips so easy to make. It's been a long time since I am searching for a lip stain, It is really hard to find here in our country -,- and then I went along with my mom to Walter Mart and saw a lip stain that makes me think "Oh Finally! I've been searching you for so long!" so I get it excitedly and look at it's price *facepalm* It's expensive T^T

Right after I came back home, bringing no lip stain, I searched some DIY Lip stain and the technique of extracting fruits like raspberry is what I saw. The one who thought that is so wise but I don't like the fact that I have to put it in the fridge so it will not smells. I think that there are still other way to make your own lip stain. Until I came up with this DIY that only costs me P5.00 ($0.12) So cheap right?! ^__^ Let's start this DIY!~ I'm so excited =)

MATERIALS NEEDED:
FOOD COLORING
OLD LIP GLOSS CONTAINER
WATER
BOWL


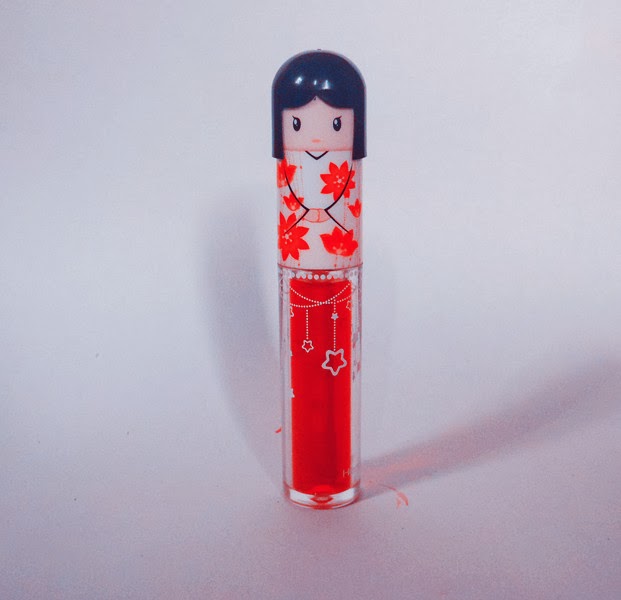
You can use other containers as well but I think an old lip gloss container works best, because its brush will make the application of the stain on our lips easier than any other container out there.


1. First thing we need to do is clean the old lip gloss container. I cleaned mine with a dish washing soap to remove the excess gloss. Do not stop cleaning the container until it is greasy.

2. In a bowl, pour a small amount of water and a food coloring. It depends on what color you are aiming to. If you want a darker color put more food coloring until it satisfies your taste.
This color is fine with me =) Kinda reminds me of blood. XD ADVANCE HAPPY HALLOWEEN EVERYONE!~


3.Pour the water+food coloring in your old lip gloss container.


WE'RE DONE!~ VERY EASY RIGHT?!!


I tested this lip stain on me and it stayed all day. It doesn't even smudge when I am eating and drinking. You should definitely try making this one =) The only cons about this is that it kinda dry your lips but you can use lip balm to avoid that. ♥♥

Friday, October 18, 2013

Basic Ulzzang Make Up Tutorial

Hello everyone! I'm back with a new make up tutorial =) As you all know, Everything about ulzzang is what I am being obsess with nowadays. So for everyone who wants to try the ulzzang look and want to start with the basic, here it is! This look can be worn in school since it is very natural!!

First step to be an ulzzang is you must have a flawless face so apply a BB cream and let it do its magic. You can use other base, but I recommend BB cream because it looks very natural, seems like you are not wearing any make up =) Actually, I wear bb cream in school and no one was able to identify that I have make up on. XD 
It will be better if you will use a BB cream that have a dewy finish. This will make you look more youthful and will make your skin looks healthy and fresh.


Apply a soft pink eyeshadow all over your lids. Don't put too much eyeshadow since we are aiming for a natural look. Just add a bit of color to your lids, it will brighten up your eyes.


Use a pencil eyeliner if you want to look more natural, but if you want to make your eyes pop, you can use the liquid eyeliner though ^___^. Extending the line will create an illusion of longer and bigger eyes which is one of the trademarks of ulzzangs, BIG PUPPY EYES!~~ *__*


Gradient Lips will make your look lips look thinner and it gives a youthful vibes. 
How I wish I can show you how to do this step by step right away, but don't worry I will make one soon T___T So temporarily, I got this pictorial from Google, which will show you the steps in order to achieve this gradient lips. 
You can also use the tint on your cheeks =) Apply it on the apples of your cheeks ^^


WE'RE FINISHED!~ SO EASY =))